

2018 School Spending Survey Report
Creating Contour Drawings and Frames
Lesson Plans for The Secret World of Walter Anderson by Hester Bass
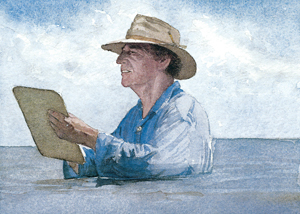
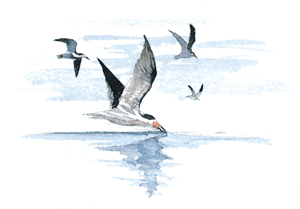
The Secret World of Walter Anderson (Bass)
© 2009 by E.B. Lewis
Creating Contour Drawings: Grades 3-5
In The Secret World of Walter Anderson, it's evident that the artist's passion for nature was the inspiration for much of his work. His drawings and watercolors of animal and plant life invite viewers to closely observe and appreciate nature. In these lessons students will create an observation drawing incorporating natural forms, then design a border to frame their work. The border design will be crafted using student-created motifs that symbolize natural forms that they would like to see people appreciate, enjoy, and protect. National Standards for Visual Art- Understanding and applying media, techniques, and processes
- Using knowledge of structures and functions
- Choosing and evaluating a range of subject matter, symbols, and ideas
- Understanding the visual arts in relation to history and cultures
- Reflecting upon and assessing the characteristics and merits of their work and the work of others
- Making connections between visual arts and other disciplines
The Secret World of Walter Anderson (Bass)
© 2009 by E.B. Lewis
Lesson #1
Aim – How will I use lines and shapes to create a contour drawing? Goals- Students will understand that artists use lines and shapes to translate objects into drawings.
- Students will understand that an observation drawing is a drawing of something an artist actually sees.
- Students will understand that a contour drawing uses line to show the outlines of the shapes that delineate an object.
- Students will be able to discover and identify the lines and shapes that make up the subject of their drawing.
- Students will be able to use lines, shapes, and outlines to create an observation drawing.
- Inspiration
- Observation drawing
- Contour drawing
- Line
- Shape
- Pencils
- Erasers
- 9” x 12” white drawing paper
- Rulers
- Branches of lemon leaves (or other leaves depending on availability)
- Individual branches should be setup in vases or containers and placed centrally so that a small group can observe one branch.
Procedure
Motivational Dialogue Opening Statement- Today you will create an observation drawing.
- An observation drawing is created when an artist draws something he or she actually sees.
- Nature was the inspiration and subject of much of Walter Anderson’s work.
- Today, nature will be the inspiration and subject of you drawing.
- Look carefully at the branches of leaves on your tables.
- How would you describe them?
- The leaves are smooth, shiny and green. The branch is thin and brown.
- What type of line would you use to draw the branch?
- My branch zigzags; I would use a zigzag line. My branch is much straighter; I would use a straight line.
- How would you describe the shape of the leaves?
- The leaf shape is an oval with points at the ends. My leaf shape is an oval with points on the ends, but the leaf is not flat. It is very wavy on the sides.
- Look closely at the edges of your leaf shape.
- What type of line would you use to draw the leaf shape?
- When I looked closely I noticed the edge of the leaf is actually a jagged line. I would use a curved jagged line. Because my leaf is wavy I would use a wavy jagged line.
- Artists use lines and shapes to create drawings of objects.
- Today you will only use lines and shapes in your drawings.
- You will not use any shading.
- This type of drawing is called a contour drawing.
- You will frame your drawings with a border design that you will draw around the edge of your paper.
- Use your ruler to measure and draw lines 1 inch in from the sides, top and bottom of your paper.
- This is the space where you will draw your border design.
- Students create border section.
- Now it is time to create your observation drawings.
- Students create their drawings.
- Share your drawings with your neighbor and talk about your experience with contour drawing and an observation drawing.
- Talk about challenges and discoveries.
- Would you do anything differently next time you work on an observation drawing?
- Were the students able to use the appropriate lines and shapes to create observation drawings?
Lesson #2
Aim – How will I use symbols to create a border design for my drawing? Goals- Students will understand that a symbol is something that represents something else.
- Students will understand that artists experiment with different ideas before they make final decisions.
- Students will be able to create a list of things from nature they want people to appreciate, enjoy, and protect.
- Students will be able to create symbols for the items on their lists.
- Students will be able to use their symbols to create border designs for their observation drawings.
- Symbol
- Logo
- Layout
 Materials
 - Students’ observation drawings
- Pencils
- The Secret World of Walter Anderson by Hester Bass
- 9” x 12” sketch paper
Procedure
Motivational Dialogue- Walter Anderson loved nature.
- His work invites us to look closely at and appreciate nature.
- Many people do not take the time to appreciate nature; some individuals exploit it.
- Please make a list of things in nature that you want people to appreciate, enjoy, and protect.
- Students create lists.
- Artists sometimes use symbols in their artwork.
- A symbol represents something other than what it is.
- A logo is an example of a symbol.
- Next to each item on your list please draw a symbol to represent the item.
- Students create symbols.
- You will use your symbols to create the border design for your observation drawing.
- Here are some examples of border designs that use symbols.
- Teacher refers to Walter Anderson’s Little Room, 1951-1953 located on the last page of The Secret World of Walter Anderson.
- What do you think these symbols represent?
- The wavy lines represent water; the zigzag lines are symbols for mountains.
- How are the symbols arranged?
- Some symbols are arranged in a pattern. Some are only in the corners. Some symbols only appear once.
- Now it is time for you to create your own border designs.
- Think about how you want to arrange your symbols within your 1-inch border.
- Try different arrangements of your symbols on sketch paper before you make your final decision.
- Artists often experiment with different layouts on sketch paper before they make final decisions about their work.
- A layout is a drawing that shows how things will be arranged.
- Once you have decided on a layout, copy your design onto your final sheet.
- Students work on layouts then copy final designs onto their paper.
- Share your border designs with your neighbors.
- Guess what each symbol stands for.
- Why were some symbols easy to decode and others symbols more difficult?
- Were the students able to create symbols that were clear representations of specific items?
- Were the students able to use their symbols to create border designs?
- Students add color to their drawings.
- Students create a second contour drawing using pencil. Students are introduced to value. Students add value to their drawings.

Added To Cart
RELATED


RECOMMENDED
CAREERS
The job outlook in 2030: Librarians will be in demand
CAREERS
The job outlook in 2030: Librarians will be in demand
ALREADY A SUBSCRIBER? LOG IN
We are currently offering this content for free. Sign up now to activate your personal profile, where you can save articles for future viewing
ALREADY A SUBSCRIBER? LOG IN
Thank you for visiting.
We’ve noticed you are using a private browser. To continue, please log in or create an account.

Add Comment :-
Be the first reader to comment.
Comment Policy:
Comment should not be empty !!!