


2018 School Spending Survey Report
SLJ Reviews the Taz 4 3-D Printer | Test Drive
Chad Sansing considers the Lulzbot device, resembling a "steampunk erector set," and 3-D printing’s learning potential.
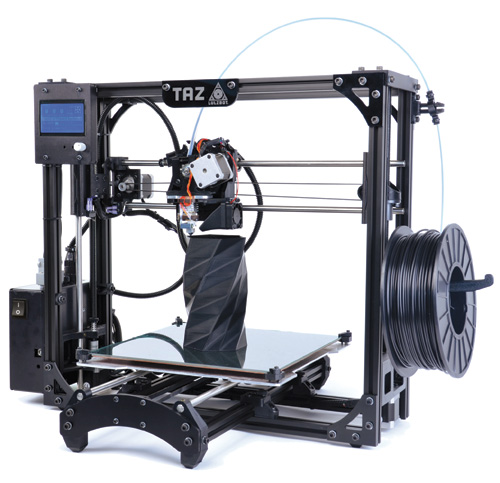 Let’s begin with the bottom line: the new Taz 4 3-D printer from Lulzbot is good. Resembling a steampunk erector set, the device commands attention whether it’s printing or not. An open physical design reflects the open-source philosophy behind its construction and programming. You can see the gears, motors, and screws that maneuver the printer’s tool-head and print-bed. It’s mesmerizing to watch, like a labyrinth of cause and effect, and it works quickly for a 3-D printer.
The Taz 4 lists for $2,194.95 online, but the company offers special pricing to libraries and schools. The price makes the Taz 4 something of a reach for a starter model, but it works well and the accompanying documentation and customer support are excellent. In the world of printers (which includes smaller, hobby models, as well as large industrial ones), the Taz 4 seems like a mid-range investment in serious printing.
A kind of magic
For most of us, 3-D printing is less a model of practicality and more a kind of magic. We’ve known about the technology and have maybe seen a few printers in the wild. However, we haven’t had much practice running the machines ourselves, and we’re still a little fuzzy on how and why to use them in an educational setting. The challenges of 3-D printing aren’t just mechanical ones. We have some work to do in imagining what 3-D printing can do in libraries and schools.
 Products like the Taz 4 make that work a little easier. The printer ships in a team-lift cardboard box that holds its frame, print-bed, and tool-head, along with a very useful, illustrated quick-start guide, a thorough technical manual, and a substantial tool kit that includes a full set of Allen wrenches, needle-nose pliers, and a number of smaller accessories useful for cleaning and troubleshooting the machine. It takes about 45 minutes to an hour to set up the printer, but if you don’t consider yourself a tinkerer or techie, you might want to budget in another hour or so to assemble the device, working at a comfortable pace. You need to go carefully, but Lulzbot provides clear and helpful instructions.
After set up, it takes another 10 to 15 minutes to download and install the open software used to run the Taz. Then it’s time to calibrate the printer. Lulzbot points users toward Printrun to calibrate the Taz and toward Slic3r to print. Essentially, if you can calibrate the printer, have a stereo lithography file (with a .stl extension) from a modeling program, and a printing client like Slic3r, you can 3-D print on the Taz. As with similar products, you can also print from an SD card inserted into the printer’s control box.
I’ve seen two other 3-D printers, and I maintain one of those in my classroom, a Makerbot Replicator 2. Neither is as fast as the Taz 4. With a heated and motorized print-bed, and something about the way it orchestrates the movement of both its tool-head and print-bed, the Taz 4 outpaces other printers I’ve worked with.
Putting together any 3-D printer feels like an epic feat, however manageable the instructions make it. By assembling the printer onsite, you get to feel like a part of its creation, you gain confidence in your abilities as a maker, and you start getting an idea of which parts do what in the machine. Even if you have tech support on-site willing to help assemble your printer, I can’t recommend enough that you take an active role in setting up your Taz (or any other printer). If you are the printer’s primary user, you don’t want to wait for or depend on someone else to work on the machine when something goes awry. Take time to learn the printer, the device’s extrusion system and calibration tools, so you can maintain it and keep the machine working at a steady pace since even small jobs can take 45 minutes to two hours to print.
So you’ve got a 3-D printer. Now what?
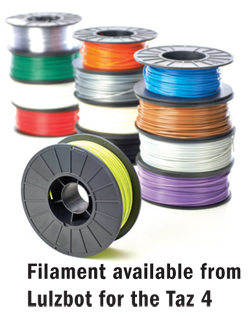
Ideally, by the time your Taz 4 arrives, you’ll have already identified some uses for 3-D printing in your classroom or library. With the amount of time it takes to set up and keep your printer running, I’m not sure a 3-D printer is something you set out for patrons and students to use at will from the get-go. The technology isn’t mature or affordable enough yet for us to take it for granted. The tool-head, which works as a kind of robotic hot-glue gun artist, runs very hot. Failed builds waste plastic filament, the printer’s physical ‘ink.’ A casual bump or sudden jolt can require you to recalibrate and level the printer from scratch. The Taz 4 is like a treadmill or elliptical machine in the cardio room at the gym. You don’t want to discourage use, but you should put some thought into who will use it, at what age, and with what kind of training.
Model learning
At first, I think we make by example and look for ways to integrate 3-D printing into existing programming and routines. For example, at our school we print small trophy cups for the winners of engineering design challenges, as well as student-of-the-week key chains. Soon, we hope to print out tiny scale models of the structures that students designed for a community-building civics and economics project in Minecraft. We’ll rebuild their cities in class, with those printed models serving as souvenirs of our virtual time together and examples of what we learned about modeling, rule of law, and market forces.
After introducing 3-D printing to our communities, the models we share will hopefully inspire ideas. Your printer might create demand for a 3-D modeling or engineering course or for a themed design competition. You might find props on 3-D printing repositories like Thingiverse to print for your next book talk or teacher’s demonstration. Even though it’s probably best to start in a controlled way, you should definitely print in an open location and print often to spark ideas throughout your learning space for the next build. Even with just one dependable printer, like the Taz 4, in your space, it’s not impossible to print an object for each “3-D Printing Club” member or student by year’s end.
 How involved others are in their own prints depends on how much design and modeling education you can offer in addition to printer training. But the long-term goal of any 3-D printing program ought to be helping people see how they can “hack” and print objects that assist them in their learning and lives. If we can help move our communities toward a future like that, we’ll help drive down the cost and complexity of these machines and increase access to design and technology for everyone we reach.
And that’s the kind of magic we do.
 Chad Sansing (csansing@gmail.com) teaches middle school language arts in Staunton, VA.
3-D Printing Resources
3D Printing Basics: The Free Beginner’s Guide An overview of 3-D printing from the 3D Printing Industry website.
FreeCAD An open computer-assisted-design (CAD) program.
Free modeling software from Autodesk Inventor, in particular, is a robust modeling program that takes some learning.
MAKE’s 3D Printer Testing Results MAKE’s ‘best of’ guide to different kinds of 3-D printers.
Sketchup Pro Another CAD app freely available online, although the ‘pro’ version is paid.

Added To Cart
RELATED


RECOMMENDED
CAREERS
The job outlook in 2030: Librarians will be in demand
CAREERS
The job outlook in 2030: Librarians will be in demand
ALREADY A SUBSCRIBER? LOG IN
We are currently offering this content for free. Sign up now to activate your personal profile, where you can save articles for future viewing
ALREADY A SUBSCRIBER? LOG IN
Thank you for visiting.
We’ve noticed you are using a private browser. To continue, please log in or create an account.

Add Comment :-
Comment Policy:
Comment should not be empty !!!
Chad Sansing
Hi, Donna! The Taz 4 is very sturdy. The frame itself is fairly heavy, and the printing plate really anchors the printer. For me, with any printer, I typically calibrate when something goes awry with a print as part of my troubleshooting ritual. I would expect to recalibrate more frequently when you start with any printer than after you've broken it in some and gotten used to its particulars. I tested ABS filament, but the product page says the Taz-4 can use 'PLA, ABS, and HIPS. Exotic filament options include nylon, wood- (Laywood), stone- (Laybrick), and rubber-like (NinjaFlex) materials, to name a few.' (https://www.lulzbot.com/products/lulzbot-taz-4-3d-printer) The ABS filament I used was +/- 3mm thick. I looked at sli3er, but did not go deep into its functionality. I think most modeling and 3D-printing programs can be used in middle school with time spent teaching any given program's functions to students. In our class, we use Autodesk Inventor and export to stereolithography (.styl) files for printing on a MakerBot 2. We should probably use sli3er to generate better-supported 'builds' or files for printing (with supports and the like). Thanks for reading! CPosted : Jan 23, 2015 06:25
Donna
Chad, Thank you for the introduction to the TAZ4. It sounds interesting. We are looking at printers and working to determine our needs and usage. A few questions from our discussion are: How sturdy is the printer? How often do you need to calibrate the printer? What type of filament is available? Is this a single type or is the nozzle flexible enough to work with emerging filament types? How fine is the filament? Have you used the sli3r software? Is it appropriate for middle school students? Is it only for copying 3D models or can students create their own products? If it is not for product creations, what software do you find works well? Thank you for an interesting article! DonnaPosted : Jan 20, 2015 08:50